On this page you can configure the DME server as an Apple MDM server.
Furthermore, you can set options for refreshing Apple MDM system information.
[ Expand All | Collapse All ]
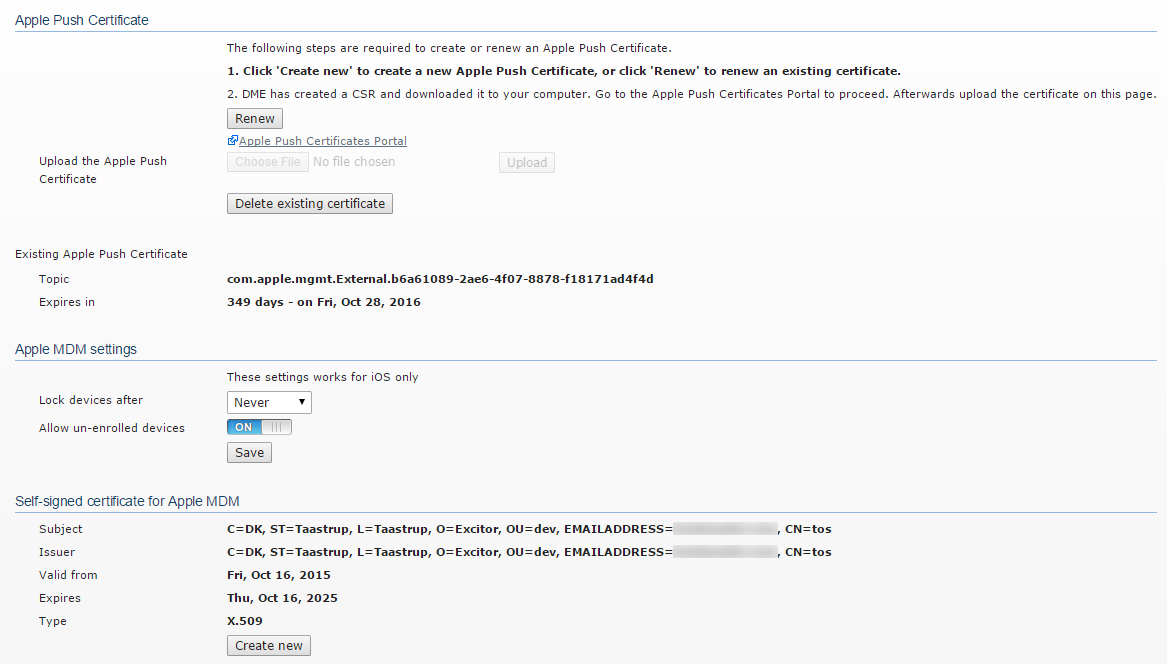
Apple Push certificate
With this group of functions you can manage the Apple Push Notification Service (APNS) certificate, which is required for using DME as an Apple MDM server. DME detects if an APNS certificate has already been installed, and shows a Create new button or a Renew and Delete existing certificate button accordingly.
If a certificate has already been installed, details about the certificate are shown at the bottom of this section of the Apple MDM window. The details include the certificate Topic (useful when you need to find the right certificate on the Apple Push Certificates Portal) and the date by which the certificate must be renewed. If this date is approaching, a message will be written to the log (see System).
The steps required are outlined at the top of this section. The step highlighted with a boldface font is the step you need to perform next. They are as follows:
Managing APNS certificate
or
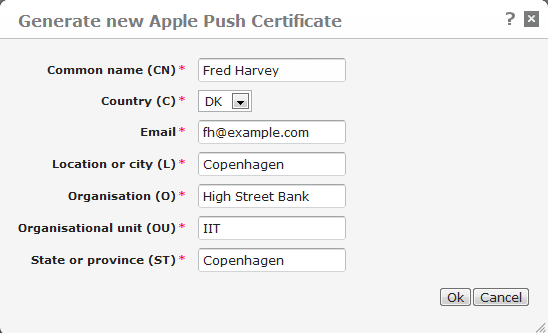
Renew. If you already have an APNS certificate on your DME server, the button will be called Renew instead of Create new. When you click it, DME immediately generates a new certificate sign request (CSR) file for you. The file is called signedCSR and is downloaded to your computer.
or
Delete existing certificate. If you already have an APNS certificate on your DME server, but you want to create a new one (start the process over), click Delete existing certificate. Confirm your choice by selecting Yes, delete Apple Push Certificate in the ensuing pop-up window, and click Delete. Note that when you do this, the existing certificate is deleted along with the associated public and private keys. You will need to create a new certificate, and if any devices were already enrolled, they must be re-enrolled using this new certificate.
Click Ok.
The DME server responds by first deleting any existing certificate on the server, and then downloading the CSR file to your computer. The file is called signedCSR.
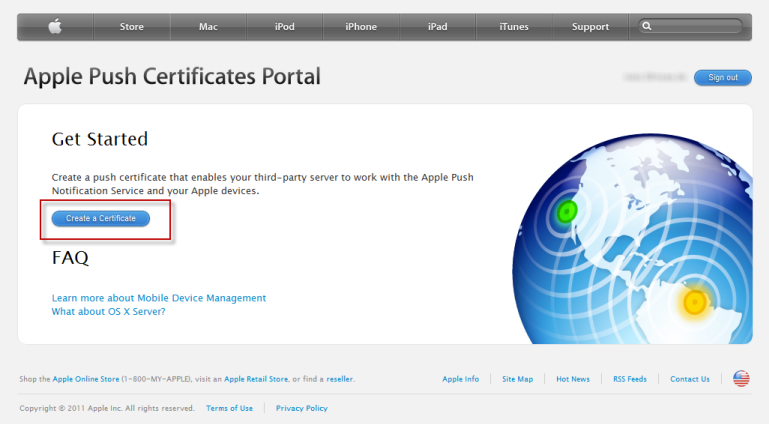
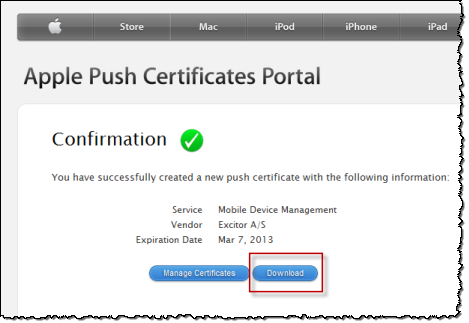
https://identity.apple.com/pushcert/) in your browser.After signing in, you reach the Apple Push Certificates Portal page. If you have any existing certificates, they are listed here. If you do not have any certificates yet, the page will look like this:
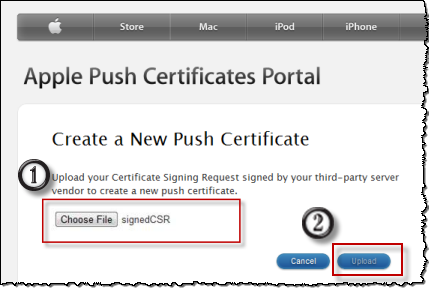
Select the file, and click Upload.
Click Download to retrieve the certificate.
Switch back to the DME web administration interface.
The certificate is uploaded to the server.
When you have completed the above steps, restart the DME server to refresh the certificate cache. DME detects the presence of the certificate, and automatically turns MDM APNS on. You can see the APNS connection status by selecting the Server tab > Server configuration > Monitor > Server properties. The field Apple MDM push notification status changes from Disconnected to Connected. See Monitor.
Important legal notice: Apple is very clear that a certificate can be installed on ONE server only. This means that if you for instance run a test server and a production server, you will need two separate certificates.
Firewall setup: The introduction of DME Central Services in DME Server 3.5 SP 3 made it possible to run APNS using the DME Central Services server, which in turn enabled you to close the firewall ports to the Apple APNS server.
However, the Apple MDM system requires that no proxy (the role played by the DME Central Services server) may stand between the Apple APNS server and the MDM server (DME). This makes it necessary to open your firewall to the following URIs:
gateway.push.apple.com:2195feedback.push.apple.com:2196
Note also that if you are using an Apple iOS device over WiFi, you need to open port 5223 in order to be able to receive notifications. See the Apple knowledge base for more information.
When you are done, you are able to enroll Apple devices with the DME server. See Enrolling devices.
With this function, you can let DME lock devices when they no longer respond to MDM messages. The devices can be locked after 24 hours, 7, 14, or 30 days, or Never. Once a device is locked the MDM enrollment will change state to Inactive. The enrollment state will change back to Enrolled if the devices starts responding to messages again, but it still needs to be unlocked manually by an administrator.
The reason you want to do this is to force users to be MDM enrolled in order to use the DME client. If an enrollment has been removed on the device, locking the device makes sure that it is enrolled again before giving access to DME. Once an enrollment changes state to Inactive a message is also logged in the surveillance log (see Data).
It is important to note that the Apple protocols do not allow DME to prevent the user from removing an enrollment from their device. If the user removes the main DME MDM enrollment, the device loses its bootstrapped status, and must be enrolled again in order for any MDM feature to work.
If this setting is On, DME will allow iOS devices that does not have an enrollment to connect to DME. Devices with an enrollment that is marked as removed on the device or an inactive enrollment will not be affected by this setting.
Click Save configuration to save the current configuration.
 Self-signed certificate for Apple MDM
For Apple MDM enrollment to work, you need to create a special self-signed certificate (SSC). In this section of the Apple MDM page you can generate a certificate for this purpose. Until you do this, DME displays the message MDM not configured, and Apple MDM will not work.
To generate the certificate, click Create new. A window pops up in which you can enter information about your organization, just as when you created the Apple Push certificate (see Apple Push Certificate above). The Common name (CN) that you enter here will be used as the name of the Apple MDM profile on the users' devices.
When you click Ok, DME signs the certificate and stores it in the DME database.
If the self-signed certificate has already been generated, details about the certificate are shown in this section of the window.
In previous versions of DME, the self-signed certificate was auto-generated by DME and signed with Excitor hardcoded as common name.
|
Next topic |